Last week I dropped the Eldo at Pepboys for a brake inspection. New for 1968, the Eldorado has power front discs with drums in the rear. My symptoms are a very low squishy pedal and gurgling noises. I suspect a leak and air in the lines. The car stops reasonable well so maybe I won't need pads, rotors, shoes and/or drums.
Update on this issue. The Eldo only needed rear shoes. Drums and rotors in good shape. Individual cylinders are good with no signs of leakage. Master cylinder needs to be replaced or rebuilt. Pedal is still low and squishy. Didn't bleed the brakes since the master still needs work. The master of course is unique to the 1968 Eldorado and very difficult to find. A rebuild kit is easier to find. Need to do something about this soon.
Saturday, June 11, 2011

Stereo Dash
The used tan stereo dash arrived. It is in good condition with the exception of a small 1" long slice on the top just to the right of the steering wheel. Of course it is directly in the line of sight. So it had to be fixed.
I bought a vinyl repair kit that included all sorts of colors to match your vinyl as well as an adhesive that when cured can be textured. The kit has three different texture squares. You place the texture square on the patch and apply heat with a branding iron type tool.
Here you can see the tan dash with the repair. I didn't bother matching the color since I am going to dye the entire dash anyway.

The adhesive patch worked GREAT. The texture turned out ok. Not as perfect as I wanted, but I'm hoping good enough.
The dye on the other hand is amazing. You would never know the dash was not originally black.

The used dash did come with speakers but they were completely shot. Most '60s and '70s General Motors cars used 10 ohm speakers. An 8 ohm speaker will work fine. Most speakers available today are 4 ohm which will NOT work. I haven't solved this problem yet, but my choices are 8 ohm generic 3 1/2" speakers or refurbished 10 ohm speakers.

Before the dash goes in I want to address any other issues behind the instrument cluster. There may be a few lights out and the clock doesn't work, for starters. And I could take this opportunity to install the Twilight Sentinel amplifier and power door lock vacuum distribution block. I should also check the integrity of any other vacuum lines back there. They are easy and cheap to replace if cracked or brittle.
It would be so much easier to work from the top and bottom on these things, instead of just from the bottom at a future date. Although, remember this car is front wheel drive and the floor is COMPLETELY flat. Even the exhaust pipes are run down the side of the car next to the frame rails. So you can lie on your back on the floor in front of the seat and easily reach up under the dash.
I bought a vinyl repair kit that included all sorts of colors to match your vinyl as well as an adhesive that when cured can be textured. The kit has three different texture squares. You place the texture square on the patch and apply heat with a branding iron type tool.
Here you can see the tan dash with the repair. I didn't bother matching the color since I am going to dye the entire dash anyway.

The adhesive patch worked GREAT. The texture turned out ok. Not as perfect as I wanted, but I'm hoping good enough.
The dye on the other hand is amazing. You would never know the dash was not originally black.

The used dash did come with speakers but they were completely shot. Most '60s and '70s General Motors cars used 10 ohm speakers. An 8 ohm speaker will work fine. Most speakers available today are 4 ohm which will NOT work. I haven't solved this problem yet, but my choices are 8 ohm generic 3 1/2" speakers or refurbished 10 ohm speakers.

Before the dash goes in I want to address any other issues behind the instrument cluster. There may be a few lights out and the clock doesn't work, for starters. And I could take this opportunity to install the Twilight Sentinel amplifier and power door lock vacuum distribution block. I should also check the integrity of any other vacuum lines back there. They are easy and cheap to replace if cracked or brittle.
It would be so much easier to work from the top and bottom on these things, instead of just from the bottom at a future date. Although, remember this car is front wheel drive and the floor is COMPLETELY flat. Even the exhaust pipes are run down the side of the car next to the frame rails. So you can lie on your back on the floor in front of the seat and easily reach up under the dash.
Too Many Irons in the Fire
When I started this restoration I told myself I would prioritize projects and work on important things first, like the brakes and non-functioning equipment like the air conditioning and cruise control.
But I spend a lot of my free time browsing ebay for Eldo parts. This is how I found the bucket seats. They are so rare I had to get them now even though that project is near the bottom of my list.
Also on the long term list are installing items like the Twilight Sentinel, Guide-Matic, and Power Door Locks.
I've assembled a lot of the necessary items for these projects but its time to put them aside and get back on track.
When the Eldo gets back from Pepboys with new brakes I'm going to pack up the parts and store them in the trunk with the buckets.
Now its time to work on the stereo dash pad that should arrive anyday. There is a small cut in the top that will have to be repaired. Then the entire thing will be dyed black. Not sure if it will come with speakers. If not, they will have to be purchased and installed in the dash before I install the dash in the car.
But I spend a lot of my free time browsing ebay for Eldo parts. This is how I found the bucket seats. They are so rare I had to get them now even though that project is near the bottom of my list.
Also on the long term list are installing items like the Twilight Sentinel, Guide-Matic, and Power Door Locks.
I've assembled a lot of the necessary items for these projects but its time to put them aside and get back on track.
When the Eldo gets back from Pepboys with new brakes I'm going to pack up the parts and store them in the trunk with the buckets.
Now its time to work on the stereo dash pad that should arrive anyday. There is a small cut in the top that will have to be repaired. Then the entire thing will be dyed black. Not sure if it will come with speakers. If not, they will have to be purchased and installed in the dash before I install the dash in the car.
Tuesday, May 24, 2011
Bucket Seats
My car came from the factory with the standard interior Diamond Pattern Cloth with Vinyl Bolsters in Black, trim code 410.

The front bench seat was equipped with the optional 6-way power adjuster (2-way was standard). When I acquired the car the black cloth front and rear had been replaced with maroon cloth. I don't have any confidence at all that it is Maroon 449.

It is in very good condition however. Any interior modifications could wait till other more important issues were dealt with.
Then I started to read. Leather bucket seats with a center console were offered with or without headrests and a passenger recliner. Both buckets were 2-way power adjustable with a 4-way driver optional. Apparently the bucket seat option was very rare at only 1-2% of the annual production. Without really looking for them, I found a set of black leather buckets on ebay. I had to have them. Don't even ask how much shipping from St. Louis was.

ELDORADO STANDARD INTERIOR
Diamond Pattern Cloth with Vinyl Bolsters
COLOR/CODE
Black 410
Aqua 429
Covert 440
Maroon 449
Diamond Pattern Cloth with Vinyl Bolsters
COLOR/CODE
Black 410
Aqua 429
Covert 440
Maroon 449
The front bench seat was equipped with the optional 6-way power adjuster (2-way was standard). When I acquired the car the black cloth front and rear had been replaced with maroon cloth. I don't have any confidence at all that it is Maroon 449.

It is in very good condition however. Any interior modifications could wait till other more important issues were dealt with.
Then I started to read. Leather bucket seats with a center console were offered with or without headrests and a passenger recliner. Both buckets were 2-way power adjustable with a 4-way driver optional. Apparently the bucket seat option was very rare at only 1-2% of the annual production. Without really looking for them, I found a set of black leather buckets on ebay. I had to have them. Don't even ask how much shipping from St. Louis was.

This photo makes them look pretty good. They are not good. They will have to be reupholstered but the back seat will have to be done anyway. Note also the power seat wire harness. Yikes. These are the 2-way power buckets. Not sure if I can adapt the 6-way motor and transmission but I'll try. Later. Way later. These will go into the trunk till I get to them.
Saturday, May 14, 2011
Junkyard Dog
Today was my first trip to a salvage yard. I paid the $2 entrance fee, got a handstamp, had my toolbox inspected and passed through the turnstyle.
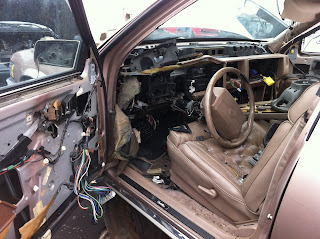
I was directed to the back wall of the junkyard to the american cars. I found only six Cadillacs: a 79 Eldorado, an 89 DeVille, a 90 Fleetwood, a 94 Seville, a 97 Eldorado and an Allante. This picture is typical of what they look like on the inside. In some case, from the front end you can't tell what they used to be. Headlights, bumpers, hoods, engines, wheels, transmissions....all gone. I even saw an electric glass sunroof removed from one car, track, wiring harness, switches and all. Crazy.
 I was looking for a photosensor so I can someday install the Twilight Sentinel option that my car was not ordered with. I found three of them and bought them all just in case ($4 each). Good thing I did too, one tested bad at home. I also found a headlight switch that had the Twilight Sentinel controls ($15). Then I got greedy and yanked a climate control head unit ($20), a wiper switch ($10) and two driver's door power mirror controls ($4 each). I figued these parts were easy to disconnect and surely they would be easy to sell on ebay.

Lessons learned:
1) Don't pull parts off just because you THINK they may be valuable. You're paying for something you might not be able to sell at all, let alone at a profit. For example, the power mirror controls I paid $4 each for. When I got home and checked ebay, I couldn't even find one for sale. So I have no idea how to price them. I would rather have found 2 or 3 for sale online so I could list mine at a reduced price for a quick sale. So I probably just lost $8. But some poor bastard is not going to find that one part he is looking for. And some day, that poor bastard will be me. It's called Carma.
2) Take gloves! Either gloves to work in, or gloves to drive home in. These cars have been sitting outside in the weather for Lord knows how long. Plus there seems to be a layer of dirt/oil/grease/antifreeze/gasoline/diesel covering the entire place. It's one big Superfund site.
3) Take the voltmeter. Real easy to check for conductivity in most sensors and switches.
At the end of the day, I'm very happy I found the Twilight Sentinel parts. I listed the climate control unit on ebay for $50 and the wiper switch for $45. I threw out the bad photosensor. I'll keep the second as a spare. The other could fail at any time. Not sure what to do with the mirror controls yet.
Can't wait for my next visit to the yard!
I was directed to the back wall of the junkyard to the american cars. I found only six Cadillacs: a 79 Eldorado, an 89 DeVille, a 90 Fleetwood, a 94 Seville, a 97 Eldorado and an Allante. This picture is typical of what they look like on the inside. In some case, from the front end you can't tell what they used to be. Headlights, bumpers, hoods, engines, wheels, transmissions....all gone. I even saw an electric glass sunroof removed from one car, track, wiring harness, switches and all. Crazy.


Lessons learned:
1) Don't pull parts off just because you THINK they may be valuable. You're paying for something you might not be able to sell at all, let alone at a profit. For example, the power mirror controls I paid $4 each for. When I got home and checked ebay, I couldn't even find one for sale. So I have no idea how to price them. I would rather have found 2 or 3 for sale online so I could list mine at a reduced price for a quick sale. So I probably just lost $8. But some poor bastard is not going to find that one part he is looking for. And some day, that poor bastard will be me. It's called Carma.
2) Take gloves! Either gloves to work in, or gloves to drive home in. These cars have been sitting outside in the weather for Lord knows how long. Plus there seems to be a layer of dirt/oil/grease/antifreeze/gasoline/diesel covering the entire place. It's one big Superfund site.
3) Take the voltmeter. Real easy to check for conductivity in most sensors and switches.
At the end of the day, I'm very happy I found the Twilight Sentinel parts. I listed the climate control unit on ebay for $50 and the wiper switch for $45. I threw out the bad photosensor. I'll keep the second as a spare. The other could fail at any time. Not sure what to do with the mirror controls yet.
Can't wait for my next visit to the yard!
Monday, May 9, 2011
Hazard Flasher
Well, in quite possibly the easiest repair to date, the in-stock hazard flasher at Pepboys was a plug-in solution to my problem. I actually hesitated inserting it in the fuse block. And then I paused before I pushed the button. I was nearly certain there would be either smoke from beneath the dash or the defunct cruise control would somehow miraculously come to life and drive the car through the garage wall into the living room. But no, I now have emergency flashers in preparation for the inevitable side-of-the-road stoppage that surely is somewhere in my future.
Climate Control
While I had the car out in the driveway yesterday testing the antenna and radio, I thought I would do some initial testing on the air conditioning. I have read a lot about the problems others have had with this system. Most everyone's problems begin or end with vacuum issues. Here are a few of my initial observations. Under no circumstances does the compressor run. This could be a controls issue or the refrigerant could be low or completely gone from the system. The temperature dial seems to control the modulation of the heater door. This is really good news since that door is buried deep in the firewall and it means the string of three temperature sensors is intact and working. Sliding the mode lever from Off towards the right to Lo, Auto or Hi does nothing. From what I've read this seems to be a common problem that will require a lot more time and effort. However, moving the lever all the way to Fog or Ice, and then back to Lo, Auto or Hi seems to modulate the fan speed and open/close the proper vents. Again, good news, meaning for the most part the vacuum lines seem to be intact and the doors functional. After I address the known leak in the vacuum lines at the headlight switch I will revisit this system. At least I can get the fan to blow ambient air.

Subscribe to:
Posts (Atom)