I found some statistics in Ward's Automotive about the production numbers for the 1968 Eldorado.
98.8% of them had the automatic climate control. 78.9% had the tilt telescope steering wheel. 96.5% had either the 4 way or 6 way power seat. Vinyl top, 86.6%. White walls, 99.1%. Tinted glass, 99.2%. Cruise control, 29.1%. And paint color white, 10.8%.
My car is now black, which was 5.5% of production and if I install the bucket seats only 3.2% had them from the factory.
Saturday, June 11, 2011
Headlamp Switch and Doors
The '68 Eldorado is unique in many ways. Only the '67 and '68 had hidden headlamps. The doors are vacuum actuated and rotate DOWN when the lights are turned on. The '67 does not illuminate the parking lights when the headlights are turned on. This is what the doors on a '67 look like in action.
The '68 leaves the parking lights on with the headlights. This means the '68 headlight switch is not common with any other year, make or model car. Damn.
Here is a picture of the headlight switch. The knob is removed but mounts on the left side. You can see the vacuum ports on top. One of them is a vacuum feed from the engine. When the switch is pushed in and off, vacuum is fed to one of the other two ports, pulling the headlamp doors up and closed. When the switch is pulled out and on, vacuum is fed to the third port, pulling the doors down and open.

My headlight switch hisses when the switch is pulled out. Hopefully the switch is not bad. I'm praying for a cracked or loose vacuum line. The doors still open and close, but a little slowly. Also, there should be enough vacuum stored to cycle the doors two or three times after shutting off the engine. Mine does not.
Also, my driver's side door is slightly misaligned. It really bugs me. Not sure what I'm going to do about that.

If I successfully install the Twilight Sentinel option, the headlamp switch is no longer used to port the vacuum to open and close the doors. The switch stays in the off position and a photo sensor decides if it is dark enough to warrant the lights. An amplifier takes the photo sensor signal and through a relay turns on the lights. There is also an electropneumatic valve that takes a signal from the switch and ports the vacuum to the actuators to open or close the doors.
Power Windows
I'm very lucky in that all four power windows work. Each switch works and the windows move reasonably quickly. Now you don't want to try to raise more than one at a time. And it sure helps if the engine is running. There is a driver's door mounted lock out switch to prevent passengers from operating their windows. This is common on many cars. However, on this car, there is a third position on the lock out switch as well. You slide the switch to Emergency, hold it there, and you can operate all four windows from the driver's door without having the ignition on.

This trim panel that houses the mirror control, the window lock out switch and the window switches will have to be replaced with one that has an opening on the bottom for the power door lock switch if and when I install the vacuum door locks. This also means I'll be running vacuum feed lines to both doors and vacuum open/close lines to each actuator. At that time, I'll replace both of those wire/hose conduits that connect the doors to the body.
Also on the Eldorado, the rear windows slide back into the C pillar instead of down like most cars. I think this is really cool. But I'm a huge nerd. Check it out:
The Letter "O"
Remember my front right fender was missing an "o"? Well, all I could find was a complete set of "Eldorado" letters. Even though I only needed one letter, I thought it prudent to buy the set. Each letter has two pins and is attached invidually. A very easy repair.
Brakes
Last week I dropped the Eldo at Pepboys for a brake inspection. New for 1968, the Eldorado has power front discs with drums in the rear. My symptoms are a very low squishy pedal and gurgling noises. I suspect a leak and air in the lines. The car stops reasonable well so maybe I won't need pads, rotors, shoes and/or drums.
Update on this issue. The Eldo only needed rear shoes. Drums and rotors in good shape. Individual cylinders are good with no signs of leakage. Master cylinder needs to be replaced or rebuilt. Pedal is still low and squishy. Didn't bleed the brakes since the master still needs work. The master of course is unique to the 1968 Eldorado and very difficult to find. A rebuild kit is easier to find. Need to do something about this soon.
Update on this issue. The Eldo only needed rear shoes. Drums and rotors in good shape. Individual cylinders are good with no signs of leakage. Master cylinder needs to be replaced or rebuilt. Pedal is still low and squishy. Didn't bleed the brakes since the master still needs work. The master of course is unique to the 1968 Eldorado and very difficult to find. A rebuild kit is easier to find. Need to do something about this soon.
Stereo Dash
The used tan stereo dash arrived. It is in good condition with the exception of a small 1" long slice on the top just to the right of the steering wheel. Of course it is directly in the line of sight. So it had to be fixed.
I bought a vinyl repair kit that included all sorts of colors to match your vinyl as well as an adhesive that when cured can be textured. The kit has three different texture squares. You place the texture square on the patch and apply heat with a branding iron type tool.
Here you can see the tan dash with the repair. I didn't bother matching the color since I am going to dye the entire dash anyway.

The adhesive patch worked GREAT. The texture turned out ok. Not as perfect as I wanted, but I'm hoping good enough.
The dye on the other hand is amazing. You would never know the dash was not originally black.

The used dash did come with speakers but they were completely shot. Most '60s and '70s General Motors cars used 10 ohm speakers. An 8 ohm speaker will work fine. Most speakers available today are 4 ohm which will NOT work. I haven't solved this problem yet, but my choices are 8 ohm generic 3 1/2" speakers or refurbished 10 ohm speakers.

Before the dash goes in I want to address any other issues behind the instrument cluster. There may be a few lights out and the clock doesn't work, for starters. And I could take this opportunity to install the Twilight Sentinel amplifier and power door lock vacuum distribution block. I should also check the integrity of any other vacuum lines back there. They are easy and cheap to replace if cracked or brittle.
It would be so much easier to work from the top and bottom on these things, instead of just from the bottom at a future date. Although, remember this car is front wheel drive and the floor is COMPLETELY flat. Even the exhaust pipes are run down the side of the car next to the frame rails. So you can lie on your back on the floor in front of the seat and easily reach up under the dash.
Too Many Irons in the Fire
When I started this restoration I told myself I would prioritize projects and work on important things first, like the brakes and non-functioning equipment like the air conditioning and cruise control.
But I spend a lot of my free time browsing ebay for Eldo parts. This is how I found the bucket seats. They are so rare I had to get them now even though that project is near the bottom of my list.
Also on the long term list are installing items like the Twilight Sentinel, Guide-Matic, and Power Door Locks.
I've assembled a lot of the necessary items for these projects but its time to put them aside and get back on track.
When the Eldo gets back from Pepboys with new brakes I'm going to pack up the parts and store them in the trunk with the buckets.
Now its time to work on the stereo dash pad that should arrive anyday. There is a small cut in the top that will have to be repaired. Then the entire thing will be dyed black. Not sure if it will come with speakers. If not, they will have to be purchased and installed in the dash before I install the dash in the car.
Tuesday, May 24, 2011
Bucket Seats
My car came from the factory with the standard interior Diamond Pattern Cloth with Vinyl Bolsters in Black, trim code 410.

The front bench seat was equipped with the optional 6-way power adjuster (2-way was standard). When I acquired the car the black cloth front and rear had been replaced with maroon cloth. I don't have any confidence at all that it is Maroon 449.

It is in very good condition however. Any interior modifications could wait till other more important issues were dealt with.
Then I started to read. Leather bucket seats with a center console were offered with or without headrests and a passenger recliner. Both buckets were 2-way power adjustable with a 4-way driver optional. Apparently the bucket seat option was very rare at only 1-2% of the annual production. Without really looking for them, I found a set of black leather buckets on ebay. I had to have them. Don't even ask how much shipping from St. Louis was.

ELDORADO STANDARD INTERIOR
Diamond Pattern Cloth with Vinyl Bolsters
COLOR/CODE
Black 410
Aqua 429
Covert 440
Maroon 449
Diamond Pattern Cloth with Vinyl Bolsters
COLOR/CODE
Black 410
Aqua 429
Covert 440
Maroon 449
The front bench seat was equipped with the optional 6-way power adjuster (2-way was standard). When I acquired the car the black cloth front and rear had been replaced with maroon cloth. I don't have any confidence at all that it is Maroon 449.

It is in very good condition however. Any interior modifications could wait till other more important issues were dealt with.
Then I started to read. Leather bucket seats with a center console were offered with or without headrests and a passenger recliner. Both buckets were 2-way power adjustable with a 4-way driver optional. Apparently the bucket seat option was very rare at only 1-2% of the annual production. Without really looking for them, I found a set of black leather buckets on ebay. I had to have them. Don't even ask how much shipping from St. Louis was.

This photo makes them look pretty good. They are not good. They will have to be reupholstered but the back seat will have to be done anyway. Note also the power seat wire harness. Yikes. These are the 2-way power buckets. Not sure if I can adapt the 6-way motor and transmission but I'll try. Later. Way later. These will go into the trunk till I get to them.
Saturday, May 14, 2011
Junkyard Dog
Today was my first trip to a salvage yard. I paid the $2 entrance fee, got a handstamp, had my toolbox inspected and passed through the turnstyle.
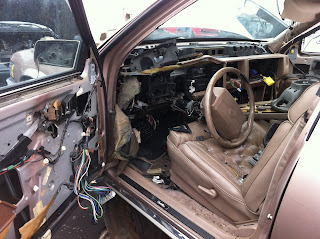
I was directed to the back wall of the junkyard to the american cars. I found only six Cadillacs: a 79 Eldorado, an 89 DeVille, a 90 Fleetwood, a 94 Seville, a 97 Eldorado and an Allante. This picture is typical of what they look like on the inside. In some case, from the front end you can't tell what they used to be. Headlights, bumpers, hoods, engines, wheels, transmissions....all gone. I even saw an electric glass sunroof removed from one car, track, wiring harness, switches and all. Crazy.
 I was looking for a photosensor so I can someday install the Twilight Sentinel option that my car was not ordered with. I found three of them and bought them all just in case ($4 each). Good thing I did too, one tested bad at home. I also found a headlight switch that had the Twilight Sentinel controls ($15). Then I got greedy and yanked a climate control head unit ($20), a wiper switch ($10) and two driver's door power mirror controls ($4 each). I figued these parts were easy to disconnect and surely they would be easy to sell on ebay.

Lessons learned:
1) Don't pull parts off just because you THINK they may be valuable. You're paying for something you might not be able to sell at all, let alone at a profit. For example, the power mirror controls I paid $4 each for. When I got home and checked ebay, I couldn't even find one for sale. So I have no idea how to price them. I would rather have found 2 or 3 for sale online so I could list mine at a reduced price for a quick sale. So I probably just lost $8. But some poor bastard is not going to find that one part he is looking for. And some day, that poor bastard will be me. It's called Carma.
2) Take gloves! Either gloves to work in, or gloves to drive home in. These cars have been sitting outside in the weather for Lord knows how long. Plus there seems to be a layer of dirt/oil/grease/antifreeze/gasoline/diesel covering the entire place. It's one big Superfund site.
3) Take the voltmeter. Real easy to check for conductivity in most sensors and switches.
At the end of the day, I'm very happy I found the Twilight Sentinel parts. I listed the climate control unit on ebay for $50 and the wiper switch for $45. I threw out the bad photosensor. I'll keep the second as a spare. The other could fail at any time. Not sure what to do with the mirror controls yet.
Can't wait for my next visit to the yard!
I was directed to the back wall of the junkyard to the american cars. I found only six Cadillacs: a 79 Eldorado, an 89 DeVille, a 90 Fleetwood, a 94 Seville, a 97 Eldorado and an Allante. This picture is typical of what they look like on the inside. In some case, from the front end you can't tell what they used to be. Headlights, bumpers, hoods, engines, wheels, transmissions....all gone. I even saw an electric glass sunroof removed from one car, track, wiring harness, switches and all. Crazy.


Lessons learned:
1) Don't pull parts off just because you THINK they may be valuable. You're paying for something you might not be able to sell at all, let alone at a profit. For example, the power mirror controls I paid $4 each for. When I got home and checked ebay, I couldn't even find one for sale. So I have no idea how to price them. I would rather have found 2 or 3 for sale online so I could list mine at a reduced price for a quick sale. So I probably just lost $8. But some poor bastard is not going to find that one part he is looking for. And some day, that poor bastard will be me. It's called Carma.
2) Take gloves! Either gloves to work in, or gloves to drive home in. These cars have been sitting outside in the weather for Lord knows how long. Plus there seems to be a layer of dirt/oil/grease/antifreeze/gasoline/diesel covering the entire place. It's one big Superfund site.
3) Take the voltmeter. Real easy to check for conductivity in most sensors and switches.
At the end of the day, I'm very happy I found the Twilight Sentinel parts. I listed the climate control unit on ebay for $50 and the wiper switch for $45. I threw out the bad photosensor. I'll keep the second as a spare. The other could fail at any time. Not sure what to do with the mirror controls yet.
Can't wait for my next visit to the yard!
Monday, May 9, 2011
Hazard Flasher
Well, in quite possibly the easiest repair to date, the in-stock hazard flasher at Pepboys was a plug-in solution to my problem. I actually hesitated inserting it in the fuse block. And then I paused before I pushed the button. I was nearly certain there would be either smoke from beneath the dash or the defunct cruise control would somehow miraculously come to life and drive the car through the garage wall into the living room. But no, I now have emergency flashers in preparation for the inevitable side-of-the-road stoppage that surely is somewhere in my future.
Climate Control
While I had the car out in the driveway yesterday testing the antenna and radio, I thought I would do some initial testing on the air conditioning. I have read a lot about the problems others have had with this system. Most everyone's problems begin or end with vacuum issues. Here are a few of my initial observations. Under no circumstances does the compressor run. This could be a controls issue or the refrigerant could be low or completely gone from the system. The temperature dial seems to control the modulation of the heater door. This is really good news since that door is buried deep in the firewall and it means the string of three temperature sensors is intact and working. Sliding the mode lever from Off towards the right to Lo, Auto or Hi does nothing. From what I've read this seems to be a common problem that will require a lot more time and effort. However, moving the lever all the way to Fog or Ice, and then back to Lo, Auto or Hi seems to modulate the fan speed and open/close the proper vents. Again, good news, meaning for the most part the vacuum lines seem to be intact and the doors functional. After I address the known leak in the vacuum lines at the headlight switch I will revisit this system. At least I can get the fan to blow ambient air.

Power Antenna Update
I stumbled upon a website specializing in hard to find parts for old Cadillacs: CaddyDaddy. Oddly enough I was able to access this site at work. They sold me a new mast and it arrived on Friday. Saturday morning I ambitiously tore apart the old antenna housing, removed all traces of the old nylon cord, clean and greased everything in sight, fed the new cord into the housing, assembled the parts and reinstalled them in the front fender. As of Sunday morning I have a completely functional power antenna. As a bonus, the radio actually tunes in FM Stereo stations!
I've learned so far that each project usually spawns a few small projects or leads to the discovery of a new larger project. During this project I figured out the front speaker doesn't work at all. I'm going to search for a correct dash pad with two new front speakers.
Also, the hazard flashers don't work. The flasher itself is missing from it's mounting postition on the fuse block. I'm hopeful an off the shelf flasher from Pepboys will work. I'd rather not find out that the flasher was pulled for a reason, or that the switch is bad. I've read that replacing the switch on a tilt/telescope steering column is not for the faint of heart.
Sunday, May 1, 2011


Power Antenna
Since I was so successful the day before, I thought I would start work Saturday, April 30, 2011 on the power antenna. Normal operation of this antenna is to pull on the radio on/off knob to raise the antenna and push on the knob to lower the antenna. The motor can be heard running in both directions. That was good news I thought, since I could rule out the radio itself and all electrical to the antenna.
Years ago, I had replaced two or three antenna masts on my '90 Corvette. The part was only about $12 but it was a bitch to replace requiring you to lie on your back under the rear quarter panel loosening the antenna and simultaneously releasing years of dirt directly into your eyes, ears, nose and throat. I would be so lucky with the Eldorado.
The service manual gives very good directions to remove the motor and mast. The mast was bent slightly but more importantly completely missing the toothed nylon tape that pushes/pulls the antenna mast up/down. Three trips to two PepBoys and an AutoZone resulted in no workable solution. At this point I'm still looking for the mast. At some point I may have to resort to a complete replacement of the power antenna, either OEM or replacement.

First Project - Turn Signal Indicator
On Friday, April 29, 2011, I started with a real easy problem and after two trips to PepBoys, I'm happy with the results.
The left front fender turn signal indicator uses a 3.8 watt bulb in a plastic socket inserted in the lens from the inside bottom of the fender, easily accessible from the engine compartment. The bulb was easy enough to find at PepBoys. However, when I inserted the bulb into the socket, the socket crumbled in my hand. Damn. Back to PepBoys to buy a new socket. They sell a socket for a Honda/Acura that takes a 4.5 watt bulb that seems like it would fit perfectly. Hopefully this doesn't cause a meltdown. I momentarily agonized that the car would no longer be original but I got over that pretty quickly. Back home, I soldered the new socket into the wiring harness, inserted the bulb/socket into the fender lens and done. That was easy.
The left front fender turn signal indicator uses a 3.8 watt bulb in a plastic socket inserted in the lens from the inside bottom of the fender, easily accessible from the engine compartment. The bulb was easy enough to find at PepBoys. However, when I inserted the bulb into the socket, the socket crumbled in my hand. Damn. Back to PepBoys to buy a new socket. They sell a socket for a Honda/Acura that takes a 4.5 watt bulb that seems like it would fit perfectly. Hopefully this doesn't cause a meltdown. I momentarily agonized that the car would no longer be original but I got over that pretty quickly. Back home, I soldered the new socket into the wiring harness, inserted the bulb/socket into the fender lens and done. That was easy.
Initial Condition
The following are my observations during the first week with the Eldorado. I haven't touched anything, but I've started to make a list of things that are not working, things that are not quite the way they were when the car was built, and a few things that need immediate attention.
Very soon I'll need to make a very important decision. Will I be restoring the Eldorado to the original condition as it left the factory? Or will I be restoring the Eldorado to a condition that it COULD have left the factory? One simple example of this is the right hand rear view mirror. This car does NOT have it, so I assume it never did. However, it could have been ordered with one. Should I add one? More on this later.

"FWD" indicates assembly at the Fisher Body Fleetwood plant in Detroit, Michigan. "21943" is the serial number. There were 24,528 Eldorados built in 1968. Now to the paint code. "12-62" is a bit tricky. The 12 most likely indicates this car was originally white. There are two or three chips in the paint that show white underneath. If it were black the code would be 10. The 62 confused me for quite a while. It is only supposed to be a single digit indicating the color of the fabric top. The 2 would mean black. There is no top color code 6. But 6 means vinyl when you are talking about seats. In any case, my black vinyl top looks original with some rust bubbles underneath. I would consider removing it completely, grinding the roof clean, and painting it black.

This Eldorado has the following options: cruise control, tilt and telescope steering wheel, automatic climate control, six-way power seat, padded vinyl roof, AM-FM Stereo radio with power antenna, remote control trunk lock, soft ray tinted glass, and although I'm sure they are not original, white wide sidewall tires.
It does not have the following options: twilight sentinel, power door locks, guide-matic power headlamp dimmer, rear windor defogger, door edge guards, rear shoulder belts, floor mats, bucket seats, firemist paint, head restraints, leather upholstery, four-way left-hand power bucket seat, rear center seat belt or front seat warmers.
The air conditioning compressor has Buick wording on it. Might not be original, but it is still an R-12 unit. R-12 is rediculously expensive to get. An upgrade to 134A might be in the works. The alternator appears newer and the fuel pump very new. There seems to be some black touch up spray paint under the hood. There is a cheesy steering wheel wrap but I'm afraid that's what underneath might be worse.

Now for the problems. On the front right fender, there is an "o" missing in "Eldorado".
 There is some minor damage to the the front right wheel cover.
 The power antenna does not raise or lower, but the motor runs in both directions. The inside rear view mirror is cracked in two places. The rubber cover around the wires between the driver's door and the chassis has been replaced with duct tape.
 The front left fender mounted turn signal indicator does not work. The trunk open indicator light does not work. The trunk light is missing. The cruise control does not work. When the headlamps are on there is the hiss of a vacuum leak from behind the switch. You should be able to cycle the headlamp doors once or twice after shutting off the engine. Due to the vacuum leak this car with not move the doors at all without the engine running. The climate control largely does not work. The brake pedal is VERY low and I found a bottle of brake fluid in the trunk. There are two minor leaks from the oil pan and/or the transmission pan. The left headlamp door when closed does not line up properly with the grille.
 The front speaker does not work. Curiously, when an Eldorado is optioned with the stereo radio there are supposed to be two speakers in the dash cover. There is only one on this car. And the dash cover fits very poorly. I'm guessing its not original. The rosewood panels on the doors are faded and cracked.
 There are a few scratches in the bumpers.
Very soon I'll need to make a very important decision. Will I be restoring the Eldorado to the original condition as it left the factory? Or will I be restoring the Eldorado to a condition that it COULD have left the factory? One simple example of this is the right hand rear view mirror. This car does NOT have it, so I assume it never did. However, it could have been ordered with one. Should I add one? More on this later.
Here we go, in no particular order!
The VIN tag is found on the front left side of the firewall.

The three digits on the upper left are "06C". This means the car was built in June (the 6th month) during the third week (letter C being the third letter of the alphabet). The style code "ST 68-69347" indicates model year '68 and 69347 for Eldorado. The trim code "TR 410" indicates a standard interior with black diamond pattern cloth with black vinyl bolsters. As you can see in the pictures the seats are very clearly not black. That said, they are in VERY good condition and look nice with the overall color scheme of the car. The carpet and headliner are in very good condition as well.

This Eldorado has the following options: cruise control, tilt and telescope steering wheel, automatic climate control, six-way power seat, padded vinyl roof, AM-FM Stereo radio with power antenna, remote control trunk lock, soft ray tinted glass, and although I'm sure they are not original, white wide sidewall tires.
It does not have the following options: twilight sentinel, power door locks, guide-matic power headlamp dimmer, rear windor defogger, door edge guards, rear shoulder belts, floor mats, bucket seats, firemist paint, head restraints, leather upholstery, four-way left-hand power bucket seat, rear center seat belt or front seat warmers.
The air conditioning compressor has Buick wording on it. Might not be original, but it is still an R-12 unit. R-12 is rediculously expensive to get. An upgrade to 134A might be in the works. The alternator appears newer and the fuel pump very new. There seems to be some black touch up spray paint under the hood. There is a cheesy steering wheel wrap but I'm afraid that's what underneath might be worse.

Now for the problems. On the front right fender, there is an "o" missing in "Eldorado".


Does that seem like a lot?
Saturday, April 30, 2011
The Search
By April of 2011 I was getting emails every morning from ebay telling me about new listings for '68 Eldorados. There were a few rust buckets, but most seemed to be in reasonable condition. There is a Cadillac shop here in Torrance called Tips Cadillac. Mark Tippett has been working on Cadillacs for 35 years. I talked to him about my search. His best advice was to avoid any vehicle with rust. Anything else could be fixed. He also casually mentioned that the '68 was the most difficult to find parts for. I would find out later he wasn't kidding.
Eventually I found a '68 in Sherman Oaks, about 20 miles north in the San Fernando Valley. I made arrangements to see it on a Sunday morning. The car drove nicely. It looked great. It was not in perfect condition, but I felt that it was car whose restoration I could handle. The ebay auction was scheduled to end in less than 24 hours.
 The auction ended with four bidders interested but the reserve not met so there was no sale. The next day the seller contacted me and said he was taking bids from the four of us. He said since I was the only one to take the time to come see the car he would give me first refusal. At noon on Tuesday I matched the high bid and won his offline auction.
That evening I picked up the car.
Eventually I found a '68 in Sherman Oaks, about 20 miles north in the San Fernando Valley. I made arrangements to see it on a Sunday morning. The car drove nicely. It looked great. It was not in perfect condition, but I felt that it was car whose restoration I could handle. The ebay auction was scheduled to end in less than 24 hours.

That evening I picked up the car.
How It All Started
I think what started this project was a movie I rented from Redbox early in 2011. It was called Kalifornia starring Brad Pitt and David Duchovny originally released in 1993. It is a story of a journalist duo on a tour of serial killer murder sites with two companions, unaware that one of them is a serial killer himself. But the real star of the show (for me anyway) was the 1963 Lincoln Continental Convertible. This is the type of car seen on the HBO series Entourage.

I turned my attention to the General Motors personal luxury cars: the Oldsmobile Toronado, the Buick Riviera and the Cadillac Eldorado. The Riviera was quickly eliminated since I just wasn't crazy enough of the styling. The Toronado was introduced in '66 with a completely new front wheel drive platform.

In '68 the styling changed for the worse, in my opinion. I started searching for '66 and '67 Toronados. There were plenty of cars available but most seemed to need a TON of work. There just didn't seem to be a lot of people interested in maintaining their Toronado.
I eventually gravitated to the Eldorado. The Eldorado style that interested me most was introduced in '67 and built thru '70. This model used a front wheel drive platform similar to the Toronado. The '68 sold for $6605 and introduced the first round of federal safety standards, the first year of concealed windshield wipers with a 4 1/2 inch LONGER hood, front turn signals moved from the bumper into the leading edge of the front fenders and the first year of the 472 cubic inch V-8 with 375 hp and 525 ft-lb of torque. After '68 the headlamps were no longer concealed. Since all these features were either important or attractive to me I narrowed my search to the '68 Eldorado.

Subscribe to:
Comments (Atom)